See my blog post Emphatic Thermometry!
Contents
Temperature Sensors
Thermal sensors are very cheap. It should be trivial to have a computer know the temperature of anything you want to monitor. But it’s not always so easy.
More Recent Hardware (2025)
-
SparkFun Qwiic OLED Display - $10.95 - This can be handy for displaying the readings.
-
AM2301B - Wired Enclosed AHT20 - Temperature and Humidity Sensor - $7.95 - A nice I2C sensor with humidity and a little protective package.
This project from https://dronebotworkshop.com seems very sensible and perhaps a good place to start. Also I like his pressure sensor project.
-
Adafruit TMP117 High Accuracy I2C Temperature Sensor ±0.1°C - STEMMA QT / Qwiic - $11.50.
-
SparkFun Qwiic Pocket Development Board - ESP32-C6 - $19.95 - A small RISC processor handy for making simple temperature sensors.
-
MS8607 - Pressure Humidity Temperature PHT Sensor - STEMMA QT / Qwiic - $14.95
-
BME280 - I2C or SPI Temperature Humidity Pressure Sensor - STEMMA QT - $14.95 - specifically mentioned used with a Pico2.
-
https://www.adafruit.com/product/4530[Adafruit LPS25 Pressure Sensor
-
STEMMA QT / Qwiic - LPS25HB] - $9.95
-
DS1820
(Everything I know about this is thanks to theamk!)
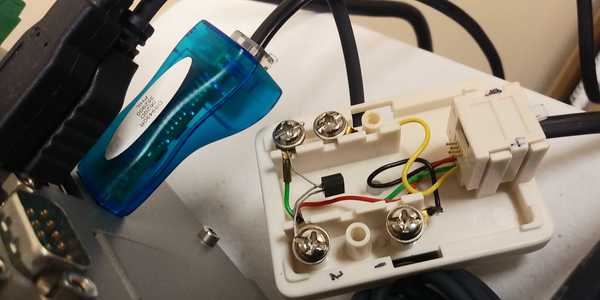
The inexpensive solution I used was a Dallas Semiconductor DS1820 wired directly to a 1-wire/USB converter using normal RJ11 4 wire telephone cable. The 1-wire protocol is explained in this wikipedia article.
Wiring
DS1820 leads go 1 to 3 left to right looking at contacts emerging from device with flat part facing up. Looking at the RJ11/12 receptacle with the retaining tab facing down, the contacts are numbered 1 to 6 (RJ12) or 1 to 4 (RJ11).
-
contact 1 = No connection
-
contact 2 = DS1820 lead #3
Vdd - Optional Vddand lead #1GND - Ground(joined) -
contact 3 = middle lead #2 of DS1820
DQ - Data In/Out -
contact 4 = No connection
I believe that multiple sensors can be wired in parallel up to some absurd limit (related to how long the cabling is; 100m cables (total) should be no problem for single devices.
One Wire File System (owfs)
You can query the state of the sensors using Linux’s one wire file system.
|
Warning
|
It can be tricky to install. On Ubuntu, don’t for get these packages: libusb-dev libfuse-dev fuse-utils (and maybe more). Though see below for modern improvements. |
Raspberry Pi
Note that Raspberry Pis are ready to go with one wire right from the
headers. Things will show up on /sys/bus/w1/devices as discussed
here.
Old-Fashioned DIY
Load fuse module (fuse = filesystem in userspace) which will allow 1-wire information to be present as a virtual file system.
$ sudo modprobe fuseRun the owfs binary that mounts the mountpoint (/mnt here) with the
1-wire data.
$ sudo ./module/owfs/src/c/owfs -u /mnt/
DEFAULT: ow_usb_msg.c:DS9490_open(263) Opened USB DS9490 bus master at 4:5.
DEFAULT: ow_usb_cycle.c:DS9490_ID_this_master(191) Set DS9490 4:5 unique id to 81 2C 70 26 00 00 00 75
Modern Pre-Packaged
In modern times (2018) it looks like it’s getting easier. Just
plugging in my USB adaptor, I got this in dmesg.
usbcore: registered new interface driver DS9490RInstalling the system now is just what one would expect.
sudo apt-get install owfsThen you can poke around a web interface at localhost:2121. Check
that the owserver is up.
sudo service owserver statusMaybe make a directory for the mount and enable that in the config.
sudo mkdir /mnt/1wireThe debian system had a neat trick where it started up with dummy
stuff as set by the config file, /etc/owfs.conf. This proved that
the drivers were all working ok. Then you can switch over to your real
hardware and start proper troubleshooting.
I found that I didn’t need the fancy web thing so I just turned it off. Then I used the old command as normal (in the default path now).
$ sudo service owftpd stop
$ sudo service owhttpd stop
$ sudo systemctl disable owftpd
$ sudo systemctl disable owhttpd
$ sudo mkdir /mnt/1wire
$ sudo owfs -u /mnt/1wire --allow_other
$ sleep 10 # Give it some time to get detected.
$ sudo cat /mnt/1wire/10.5BBC0F010800/temperature
22.0625
Don’t forget that allow_other (which comes from /etc/fuse.conf
terminology) so that you don’t have to be root to poke through things.
It also looks like you can specify this in /etc/owfs.conf.
Usage
Start querying the data. 10.5BBC0F010800 is the unique ID of my DS1820 sensor. Other sensors in the system will have other IDs.
$ printf "temp:%s\n" `sudo cat /mnt/10.5BBC0F010800/temperature`
temp:24.3125
Accuracy
The specified accuracy is +/-0.5C from -10C to +85C but I feel it’s generally within .2C. It’s certainly good enough for normal purposes. Strangely the temperature seems to be reported in full decimal notation where the resolution is 1/16 degree Celsius.
Cost
-
$2 sensor
-
$28 converter
-
$2 50ft RJ11 Modular Telephone Cord, 4 Conductor 6P4C, Pin 1-1
-
$3 Modular Surface Mount Jack, End Access, RJ12
|
Note
|
multiple sensors can use one converter. |
|
Note
|
Prices in 2010. |
Humidity
I haven’t tried these but if you’re interested in humidity it might be good to look into the Honeywell HIH-4000 Series of ICs. In 2018, they seem to be around $24.
acpi/thermal_zone
Often motherboard and CPU temperature sensors work out of the box with Linux:
$ cat /proc/acpi/thermal_zone/THM0/temperature
temperature:             50 C
It looks that that very handy virtual file is being replaced with a nice confusing mess which lives somewhere in the region of:
/sys/class/thermallm_sensors
If you’re pretty sure that there are sensors on the motherboard but acpi doesn’t show them, often lm_sensors can.
The major distributions usually have this available.
To install lm_sensors on CentOS: sudo yum install lm_sensors.
On Debian it seems to be lm-sensors.
Then you have to run sensors-detect as root. Do what it says. If,
like me, you have no idea what it’s doing, it’s probably efficient to
just accept all defaults with:
yes "" | sensors-detectIf all goes well you’ll be able to use the sensors command that
produces all kinds of info including temparatures, voltages, and fan
speeds.
sensors Command$ sensors
lm78-i2c-0-2d
Adapter: SMBus PIIX4 adapter at 0b00
VCore 1: +1.74 V (min = +0.00 V, max = +3.49 V)
VCore 2: +1.68 V (min = +0.45 V, max = +0.16 V) ALARM
+3.3V: +3.33 V (min = +2.85 V, max = +2.77 V) ALARM
+5V: +5.59 V (min = +4.84 V, max = +2.47 V) ALARM
+12V: +8.63 V (min = +8.15 V, max = +1.46 V) ALARM
-12V: -5.90 V (min = -9.46 V, max = -4.01 V) ALARM
-5V: -2.50 V (min = -3.95 V, max = -2.70 V)
fan1: 0 RPM (min = 3461 RPM, div = 2) ALARM
fan2: 0 RPM (min = 6818 RPM, div = 2) ALARM
fan3: 0 RPM (min = 168750 RPM, div = 2) ALARM
temp: +39.0°C (high = +32°C, hyst = +105°C) ALARM
vid: +3.00 V
alarms: Board temperature input (LM75) ALARM
alarms: Chassis intrusion detection ALARMIf all does not goe well, check out this
really useful on-line diagnostic of your hardware. Just feed it the
output of lspci -n.
Raspberry Pi
Since lm-sensors does not seem to find anything useful with Raspberry Pi hardware I’ve used, you have to look elsewhere. Fortunately there is a way.
function pitemp {
    # Internal temperature of a Raspberry Pi.
    vcgencmd measure_temp | sed "s:temp=\([0-9.][0-9.]*\)'C:\1:"
}
Temperature Monitoring
Often you are curious if some hardware instability is related to temperature. One easy thing to do is to set up a little script to log the temperature over time. Maybe you can see a temperature rise when the machine stops working (i.e. stops logging).
$ while sleep 10; do echo `date` `sensors|grep ^temp|awk '{print $2}'` >> ~/tempwatch_node87; done &Here’s a simple script to collect cpu average temperatures and hard drive temperature.
#!/bin/bash
# Succinct one line report of CPU average temps and hard drive temp.
DRIVE=/dev/sdb
CORES=$(grep ^processor /proc/cpuinfo | wc -l)
TS=$(date '+%Y%m%d-%H%M%S')
DT=$(sudo smartctl -a ${DRIVE} | grep Temperature_Celsius | awk '{print $10}')
CPUAVG=$(sensors | grep ^Core | cut -c16-19 | awk "{X+=\$1}END{print X/${CORES}}")
echo "${TS} CPU-${CPUAVG} HD-${DT}"
Commercial Temperature Monitoring Offerings
-
Here’s a $300 device typical of comercial offerings: http://www.temperaturealert.com/Remote-Temperature/Temperature-Alert-WiFi-Sensor.aspx
-
Or even fancier for $1000: http://www.apc.com/products/resource/include/techspec_index.cfm?base_sku=NBWL0355
-
This company sells more Spartan gear: http://sensorsoft.com/pricingpage.html
-
Another: http://avtech.com/Products/Temperature_Monitors/TemPageR_3E.htm
-
Another: http://www.itwatchdogs.com/product-detail-microgoose-9.html
-
Brian K. says that Radio Shack sells a "freezer alarm" for $40 that does the trick. No evidence of that though.
-
Expensive but apparently full featured: http://www.eesensors.com/websensor.html
IPMI
IPMI stands for "Intelligent Platform Management Interface" and is a standard used by hardware to manage monitoring by various hardware devices. IPMI can support SNMP (Simple Network Management Protocol) for querying and setting hardware states.
OpenIPMI is probably a good place to start looking for Linux IPMI functionality.
Web Weather
Maybe you’d like your computer to get the best guess of a region’s weather without sensors, or more correctly, using someone else’s sensors. Here are some hints about how to get weather information off the internet.
weather.gov
This is the USA’s best source of data, but it is a patchwork of sources and formats. They do have an HTTP API though. You can find some documentation here.
First, make sure you get a User Agent ready (see here for more info).
UA="User-Agent: XedQuery/cxe-weathergovATxed.ch"With that in place, you can make requests. It’s often helpful to use
jq to parse the JSON that is
returned. This queries the properties for a certain latitude/longitude
to find the weather service’s 2.5kmx2.5km grid coordinates.
$ wget -qO- --header="${UA}" 'https://api.weather.gov/points/43.027985,-78.881360' |\
> jq '.properties.gridX,.properties.gridY'
34
52
What’s the "office" responsible for this grid location?
$ wget -qO- --header="${UA}" 'https://api.weather.gov/points/43.027985,-78.881360' |\
> jq '.properties.forecastOffice' | awk 'BEGIN{FS="/"}{print $NF}' | tr -d '"'
BUF
Note that you didn’t need to run those commands per se — you can just look at the output of that call. Now that you know the office and their grid location for the physical location you’re interested in, you can do this call.
wget -qO- --header="${UA}" 'https://api.weather.gov/gridpoints/BUF/34,52/forecast' |\
> jq '.properties.periods[].temperature' | awk '{print ($1-32)/9*5}'
32.7778
18.3333
21.1111
14.4444
22.2222
10
17.2222
10
20
12.7778
23.3333
15
25.5556
16.6667
This prints out the forecast temps (converted from freedom units).
Here’s one for hourly forecasts. Note it doesn’t have humidity and pressure and a bunch of stuff on the graphs.
https://api.weather.gov/gridpoints/BUF/34,52/forecast/hourlyJust need the official temperature in your data? Here is a way to query current status (in C, using awk to tame exuberant precision).
$ wget -qO- --header="${UA}" 'https://api.weather.gov/stations/KBUF/observations/latest' |\
> jq '.properties.temperature.value' | awk '{printf("%6.3f\n",$1)}'
27.200
Note the confusing "KBUF" instead of "BUF" as used in previous examples. KBUF is the "station" which is collecting the weather data; BUF is the weather service field office designation.