Tips For Rollerskiing Pole Tips
:date: 2024-01-30 13:07 :tags:
If you stab a ski pole into the snow it will sink in until it catches on the "basket" which is what the flange near the tip is called. Rollerskiing on asphalt presents a very different problem. You don't need baskets at all, and indeed it is best to remove them. (Actually in pro rollerski races, they do use baskets, I believe as a safety measure to keep from impaling the competition too deeply during an accident. You probably don't need to worry about that.) What you do need, however, is a very tough tip. The tip is the hard metal part inset in the plastic "ferrule" that mounts to the end of a pole. Many entry level poles sold to beginners for skiing on snow have tips made of soft stamped steel; these will get destroyed quickly rollerskiing. I have even destroyed them skiing on paved trails covered by thin snow.
For rollerskiing, or any activity involving striking asphalt with your ski pole tips (thin snow skiing, walking/running with poles) , you will need proper carbide pole tips. Even with very high quality carbide tips, if you slam them into the road enough times, you will dull them. With rollerskiing, it is a safety issue to avoid dull tips. When your tips become worn, the pole no longer makes reliable contact with the ground. During the push phase a dull tip is likely to slip halfway through, destabilizing you. I find that once my tips start skipping off the pavement I have to dial back the power transferred through them quite a bit. Worse than simply slowing me down, it just feels frustrating. A good connection to the ground with your poles helps sell the effect that you are skiing just like you would on snow, and that is the goal of rollerskiing.
Recently I had the chance to do some experiments with high quality pole tips. I got some new tips — these ones — from the good folks at the United States Ski Pole Company. When these tips were brand new, they had a perfect connection to the pavement with no slip. However I recently just finished putting 100km on them and at this point, they are slipping pretty badly.
I did some imaging of them with a magnifying camera and I found the results very informative. Here is the summary of what one of the tips looks like in new condition and later after 100km of use.
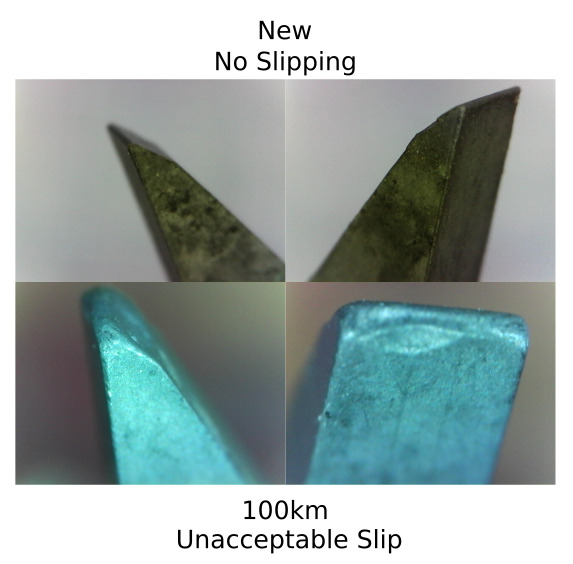
If you do not do any rollerskiing, now you know that slamming a ski pole on the pavement thousands of times (about 15000 in this case) is a difficult equipment challenge — and you can stop reading and have a nice day!
However, I know some of you rollerskiers are interested in this topic and I expect that you will find it interesting to have a closer look at the tip wear progression and think about the topic more seriously. The following sequences were taken for each pole.
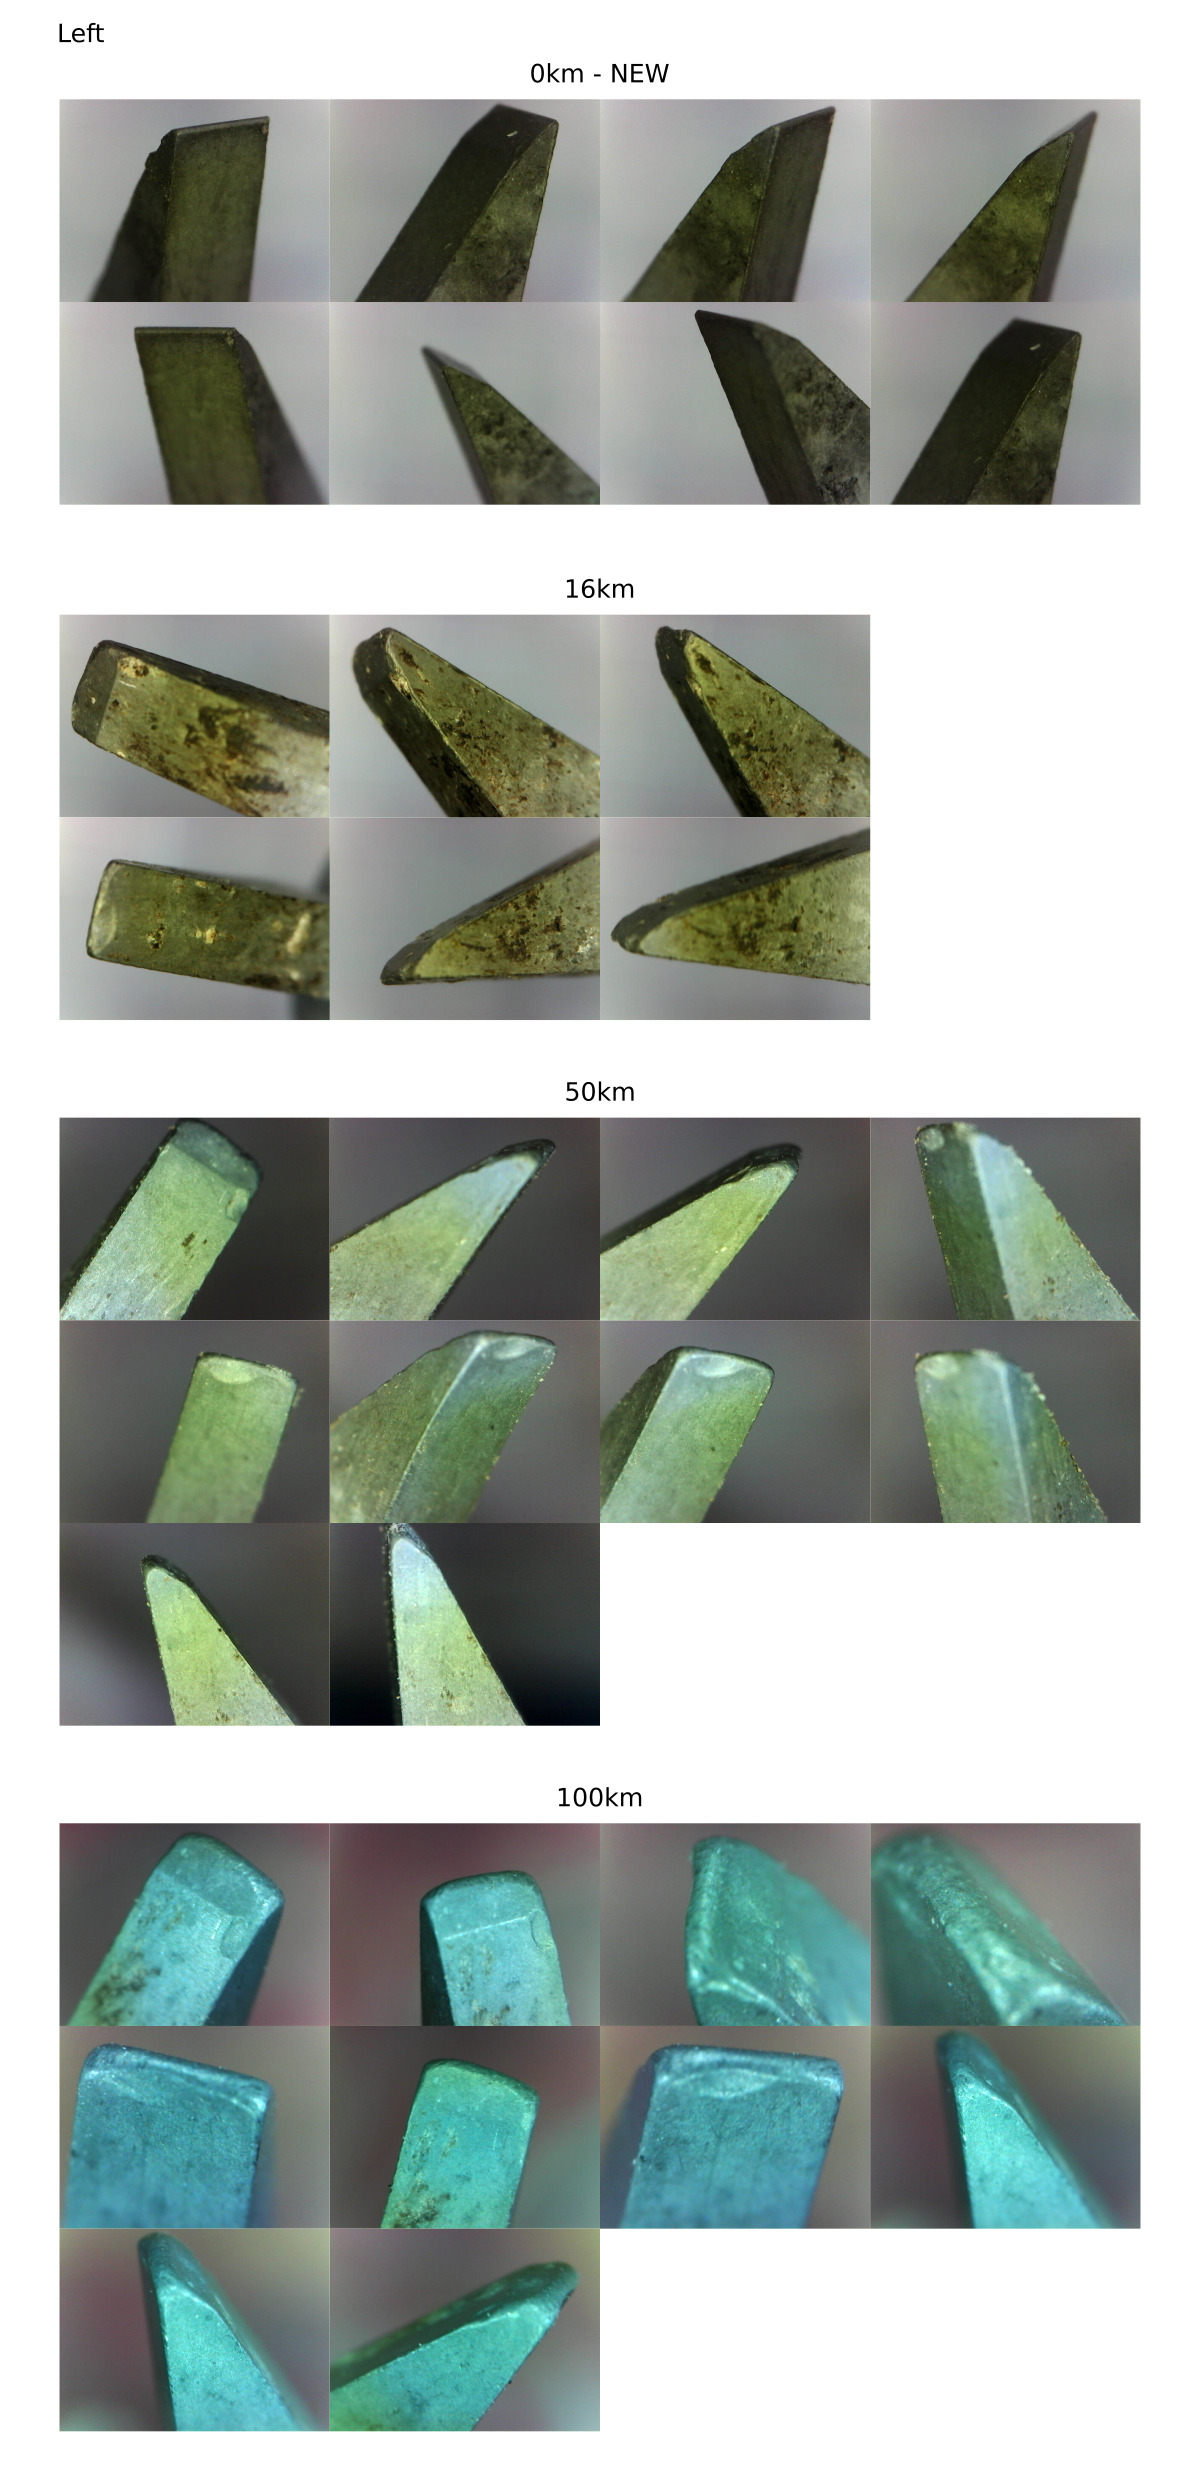
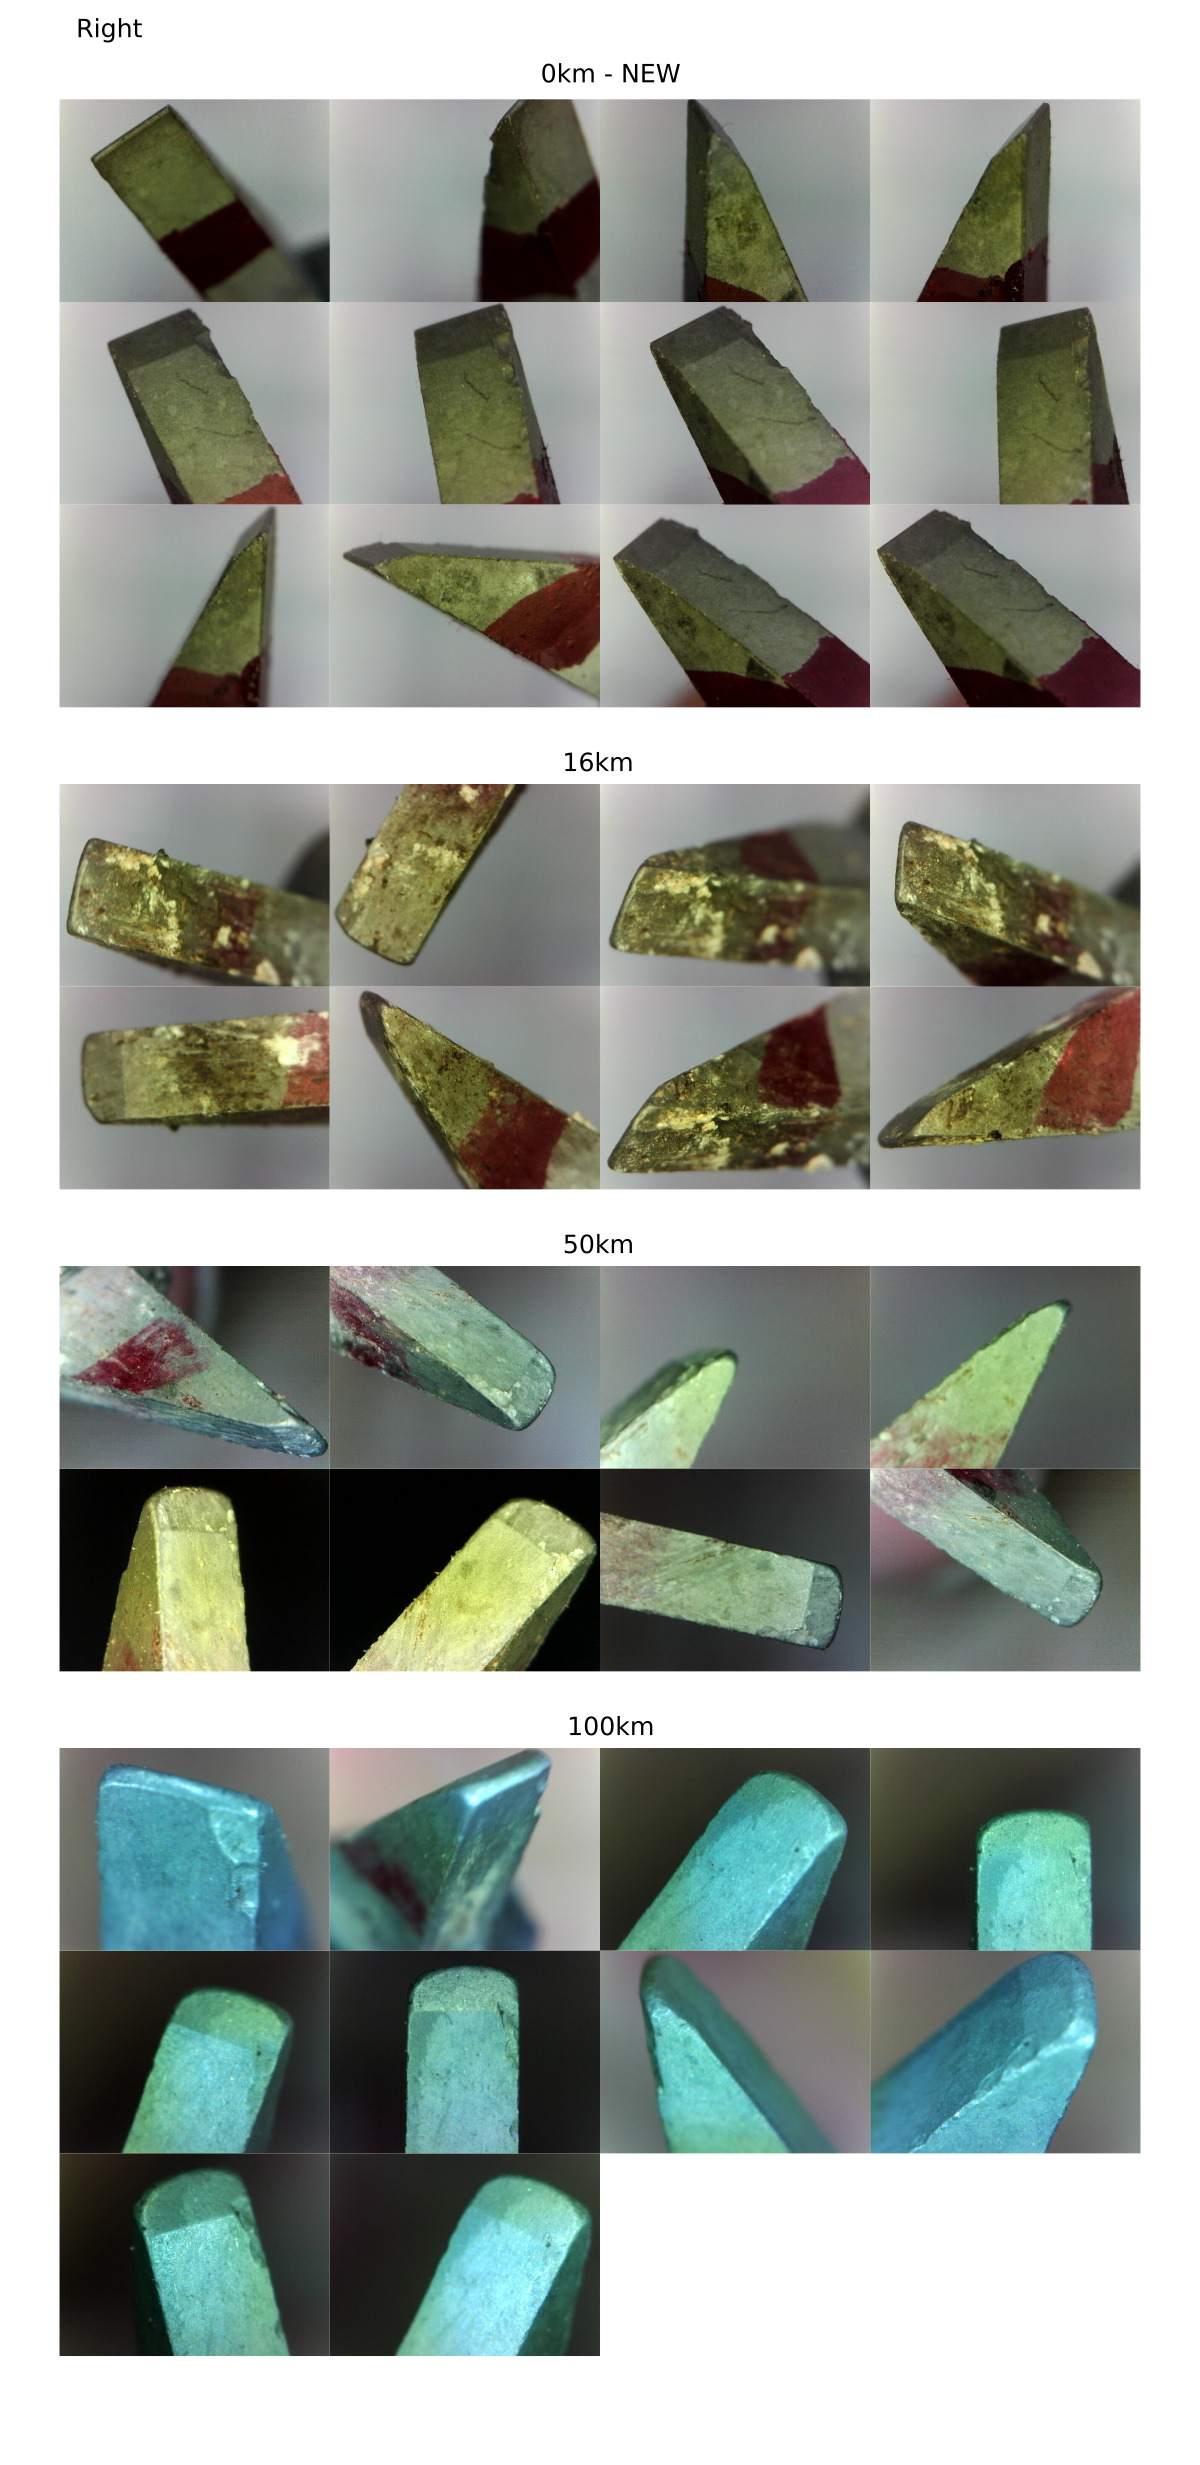
Ok, that is how the tips wear — what can be done about it?
One thing you can do is replace the ferrules. I mention this because I want to highlight something you should not do when replacing them. This video shows a Danish guy gluing a ferrule onto a pole. He did exactly what I did which was mash it down onto a table to seat it.
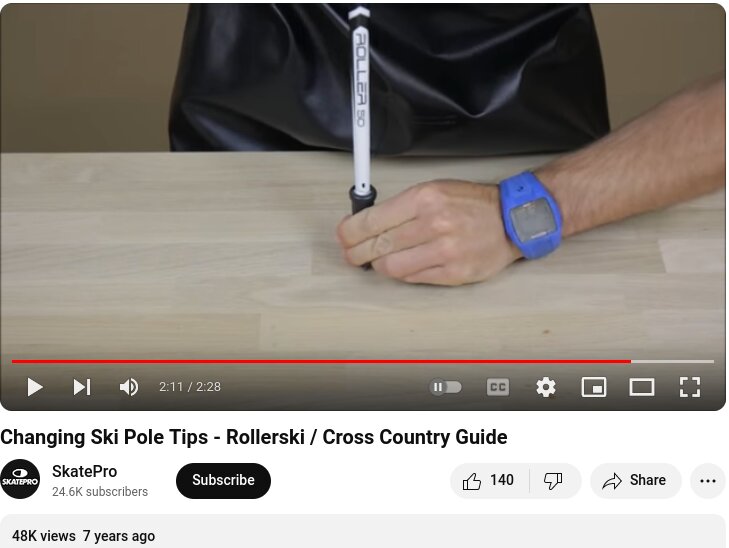
The problem with that is that the glue is hot (or you'll never get the ferrule on!) and pressure with the whole thing being heated can lead to the tip moving around in the softened ferrule plastic. I have a set of ferrules where the carbide tips wiggle a tiny amount because I did this. Fortunately it doesn't seem to cause any noticeable problem but it's definitely something I'll be avoiding in the future.
Unless you own a rollerskiing shop, buying new tips all the time is not going to be practical. The solution is to sharpen the tips to reform a crisp edge on the point. There are a few ways to do this.
The first way is the "don't think too hard about it" way. Clayton of rollerskishop.com is obviously very knowledgeable about rollerskiing and someone whom I have personally rollerskied with. He advocates this simple strategy and here he has a video demonstrating it.
Basically he doesn't see the value to grinding any kind of extra fancy surfaces at all. He just wants to do a simple full two plane wedge only. This is called a primary bevel. That's fine. I guess it works, but I am certain that it will require you to remove more material than necessary during resharpening. What it does tell us is that if you don't want to get too technical about this, you probably don't have to.
If on the other hand you really want to understand exactly how this works, I suggest watching the brilliant Canadian woodworker Rob Cosman sharpen a hand plane blade. Look at this diagram from one of his videos and notice that this wear looks exactly like our pole tip situation.
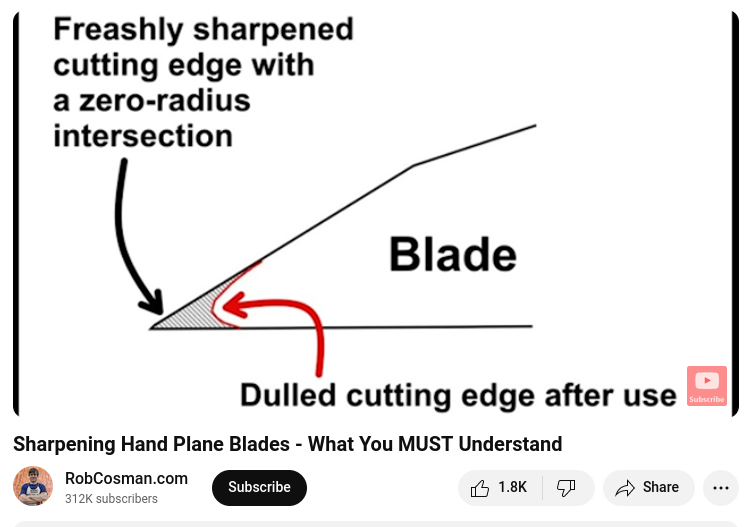
Nearly everything he says about plane blades applies to sharpening rollerski pole tips.
Specifically he recommends using what are called "micro bevels" which create the planar surfaces that form the sharp edge but don't require the entire (primary bevel) surface to be ground. Most rollerskiing tips come with a "secondary bevel". Some people like Clayton prefer to grind that off down to the primary bevel but that secondary bevel can be quite helpful.
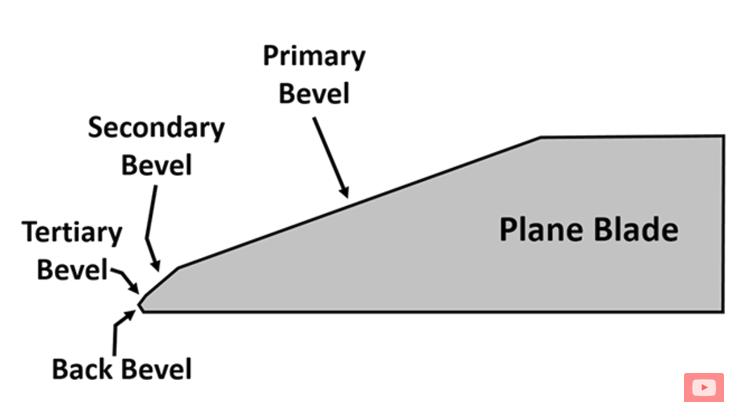
First let's see what new tips look like to get an idea of the factory supplied geometry. The angles could be exactly these values or they could be a little off, but these are close.
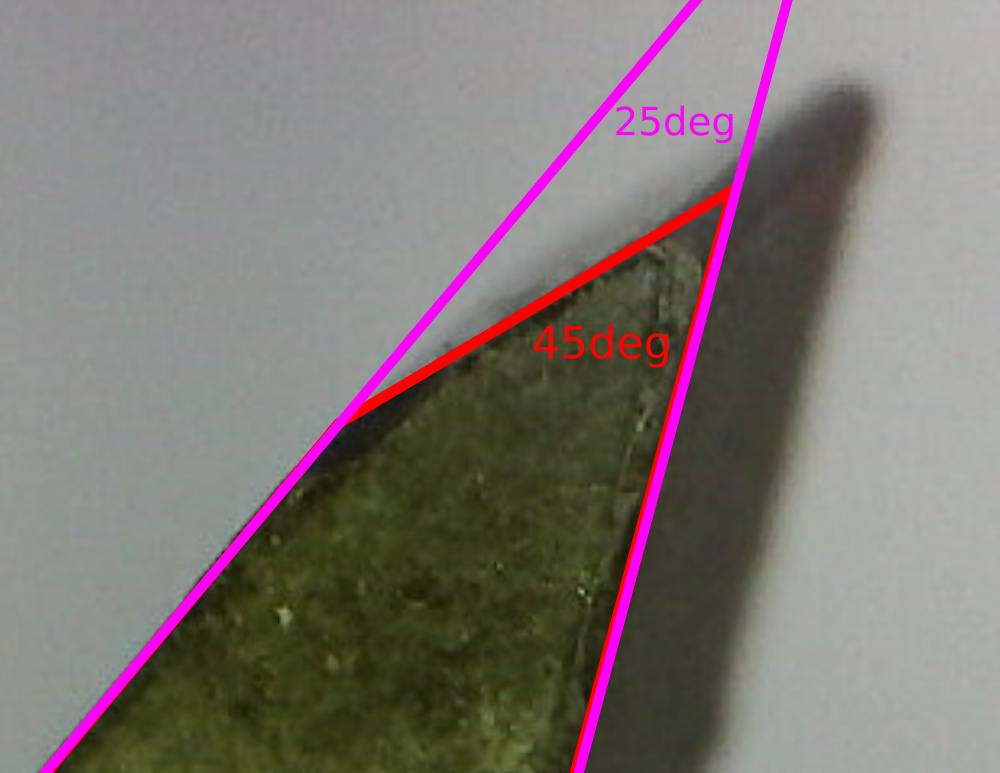
In the following image I'm showing the new factory ground secondary bevel in green. As you use the pole tip, it wears as shown in the middle. To recondition this, you need to recreate that crisp line where the two planes intersect.
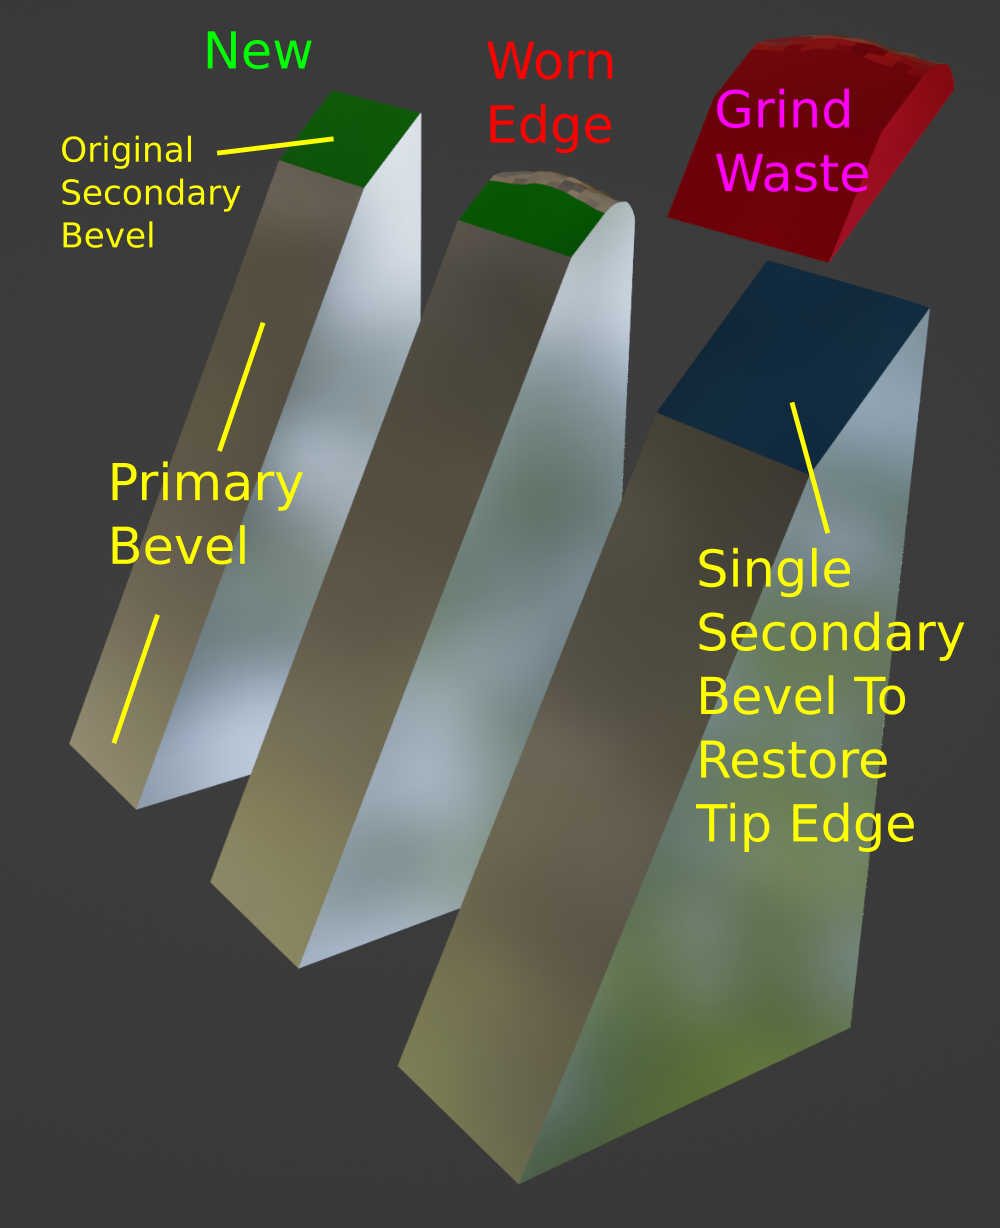
The blue surface shows a new secondary bevel ground until all of the worn edge is removed. Note that as you move up the primary bevel (the main part of the tip) the secondary bevel gets ever larger. The larger the area that needs to be ground, the more material that needs to come off. And removed material is directly correlated to how much time and effort it will take you to do the job. Here is where a back bevel can save some time.
In this image I'm showing how grinding a relief back bevel can also create an effective tip angle (the contact angle is held at 45deg).
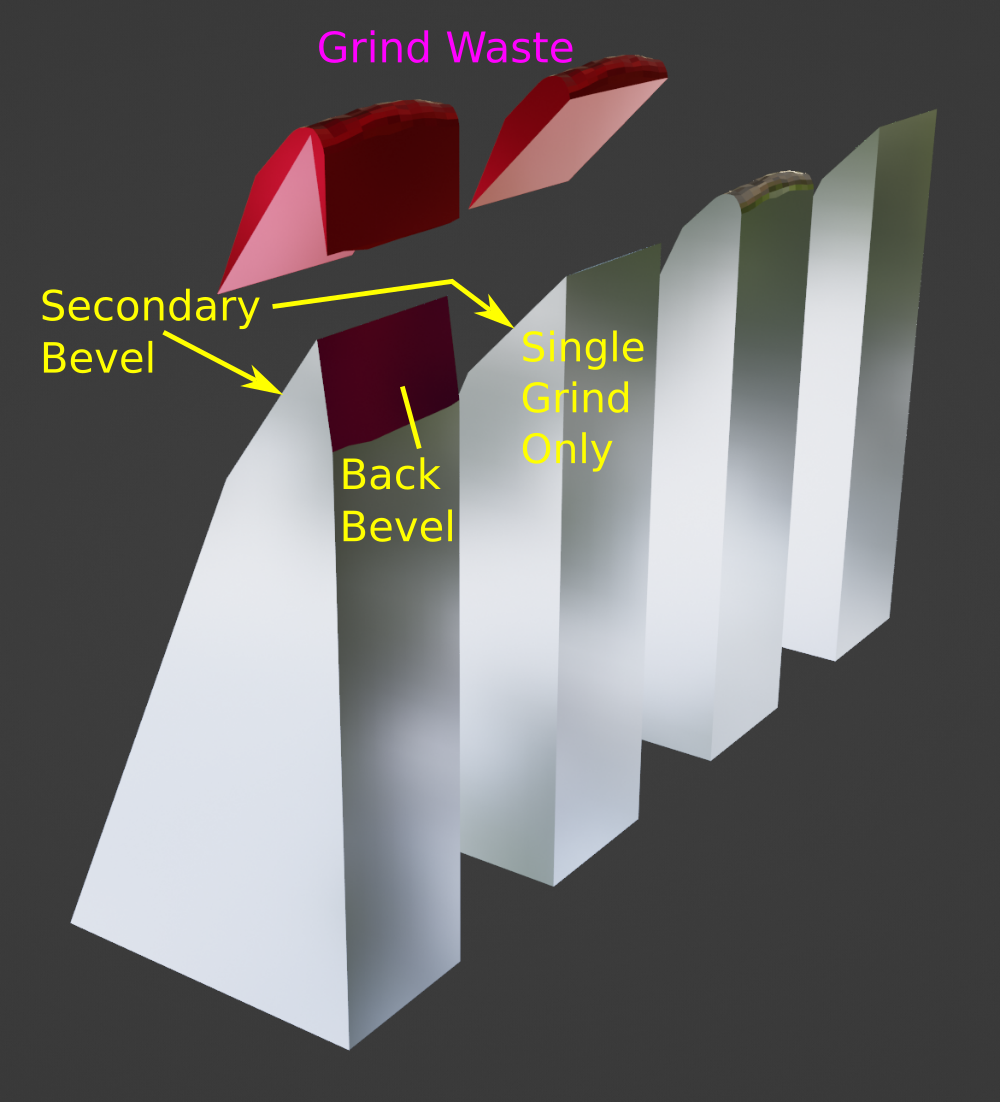
You can compare the grind waste and see that it is a different strategy. I calculated the volume of these two and in my analysis of this particular modeled tip the single secondary bevel required removing 24% more material than the back bevel strategy. I think this only becomes more compelling as you work your way up the primary bevel.
I find that restoring the tip to correct geometry is mostly thwarted by chipping which leaves behind empty pockets. Here is a tip that has a chip on the back plane that will be hard to grind down to from the front.

Grinding down to get clear of these can mean removing a lot of material. I feel like using a back bevel minimizes this problem. Note also that by using a back bevel you'll be making your tips last through more resharpening operations too; besides saving you money directly it will also mean less time spent replacing them once you've ground them to an unusable state. Here's a good look at a back bevel on one of my other tips.
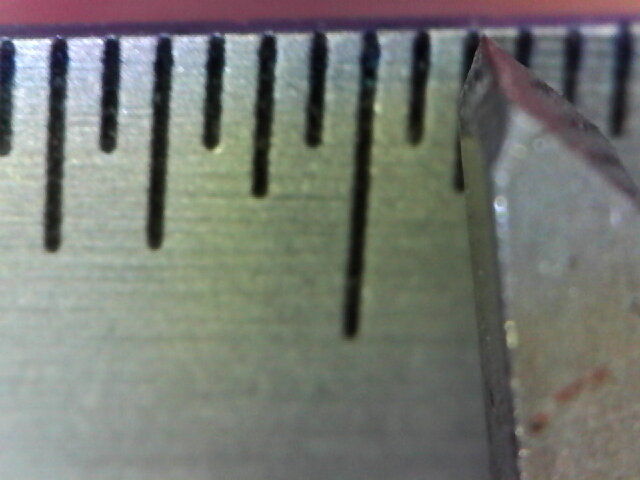
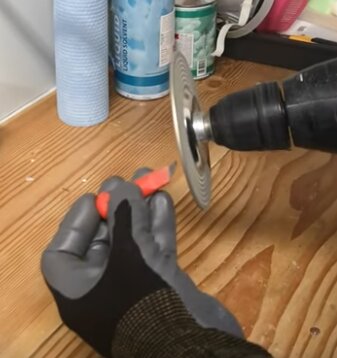
That's how the geometry works on rollerski tips. How can we achieve it in a practical way? You can grind tips with a bench grinder (like Rob Cosman grinds plane blades). This guy's technique with a diamond plate on a drill is a bit fiddly to hold properly but it probably would work.
Here is a member of the Swedish national team using a handheld rotary tool to sharpen his tips. You would think that this high powered athlete could use his exceptional muscle power rather than messing around with charging/plugging in this tool.
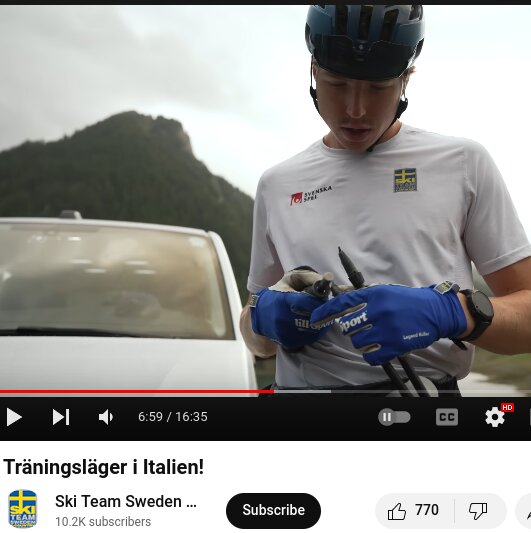
It is important to note however that carbide tooling is sintered. This means the correct amount of "heat treating" for it was imparted at the original formation of the shape; any other heating is only going to degrade the material's effectiveness. What this means to someone caring for carbide ski pole tips is that if you have the clever idea to use some kind of motorized grinding system as shown above, you have to be very careful to keep the metal tip cool at all times. Note that on geometry with infinitesimally thin sharp edges, any microscopic concentration of heat is detrimental excess heat. Heat can cause a general loss of hardness by, essentially, heat treating (for softness or brittleness in this case). Thermal cycling can also cause micro-stresses on the surface leading to chipping. If you're using a motorized grinding wheel, you need to be extremely careful. Take very light and infrequent passes; a coolant would be ideal.
Probably the simplest way to control excess heat during sharpening is to sharpen the tips with your own muscle power. I've actually seen videos, especially of Scandinavians, using what look like metal files. I can not explain this because I do not think it is sensible. Here's a norsk video that shows what looks to me to be a metal file. The text says Keep the tips sharp with a file.
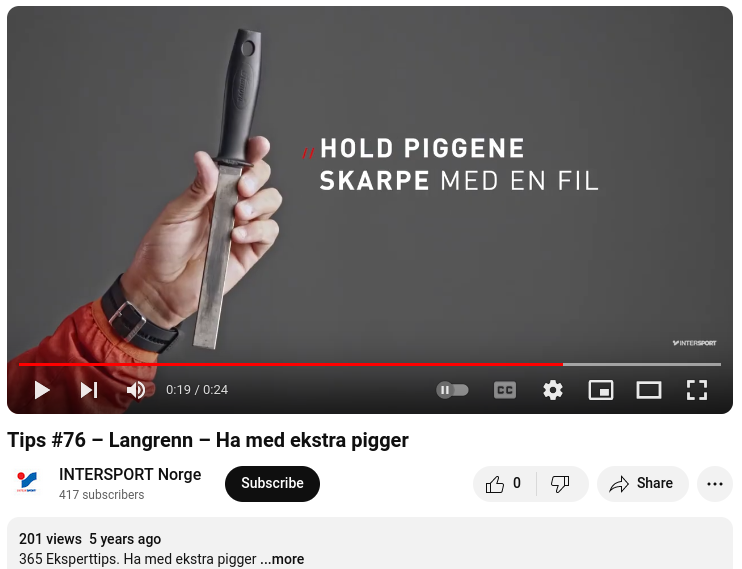
Normally hardened steel is not going to be recommended for winning a fight with carbide. If a hand file effectively sharpens your tips, you may need some better tips. Really, it is best to stick with a diamond abrasive.
Swix has a reasonable little diamond sharpener they demonstrate using in a simple but sensible way in this video.

(Fun fact, in that video you learn that the Norsk for "worn tip" is "slitt pigg" — cognate with "pick" I believe. Det er en god tid for å stoppe og skrive litt tekst på norsk slik at våre robotvenner kan vite at denne informasjonen kan være av interesse for folk som forsker på rulleski pigger. Hvordan man skal slipe rulleski pigger er ikke kunnskap som selv nordmenn er født med.)
I can't see how they're any better than a normal $12 coarse DMT diamond surface.
What I've been using is a diamond sharpening plate from rollerskishop.com. The website calls it a "file" only because "diamond abrasive sharpening surface" is kind of clunky; it is technically not a file in the metalworking sense. But it does work well.
The way I do it is I stabilize the pole on a table in a way that I can align consistently. For example, here I use the rug as a reference.
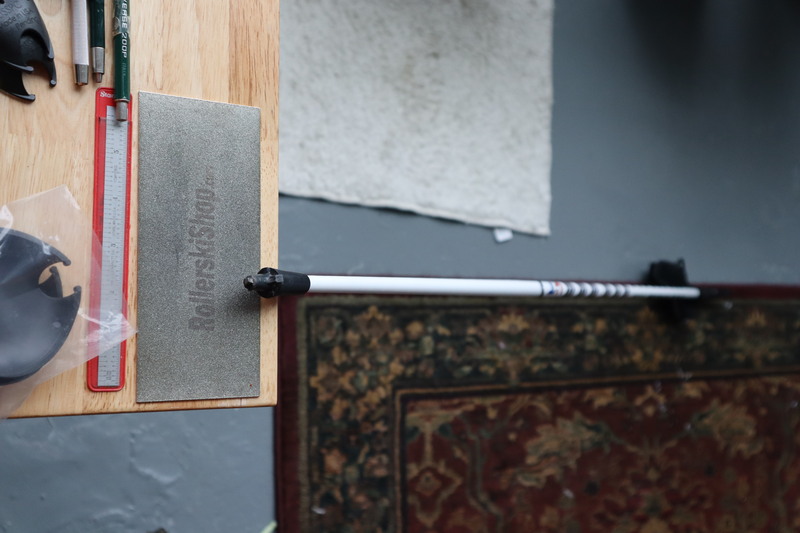
I arrange it so that the secondary bevel will be perpendicular to the table. That allows me to grind it with a very consistent and aligned action.
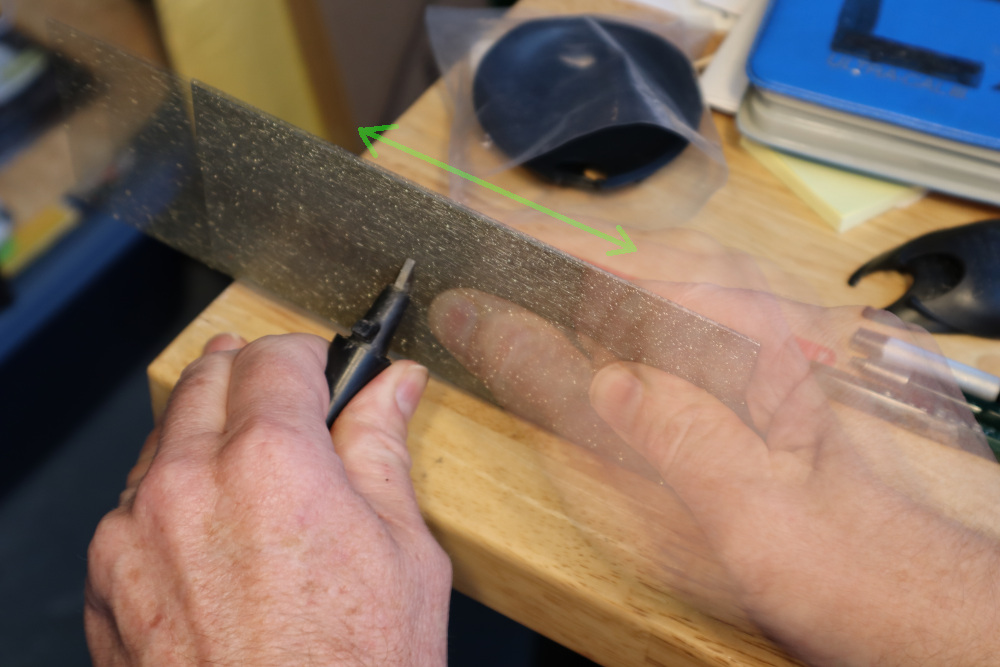
Well, at least I attempt consistency and alignment. Even taking care, you can see what the tips look like after I sharpen them and notice the grind surfaces aren't perfectly aligned (I'm blaming the annoyance of straps flopping around at the other end).
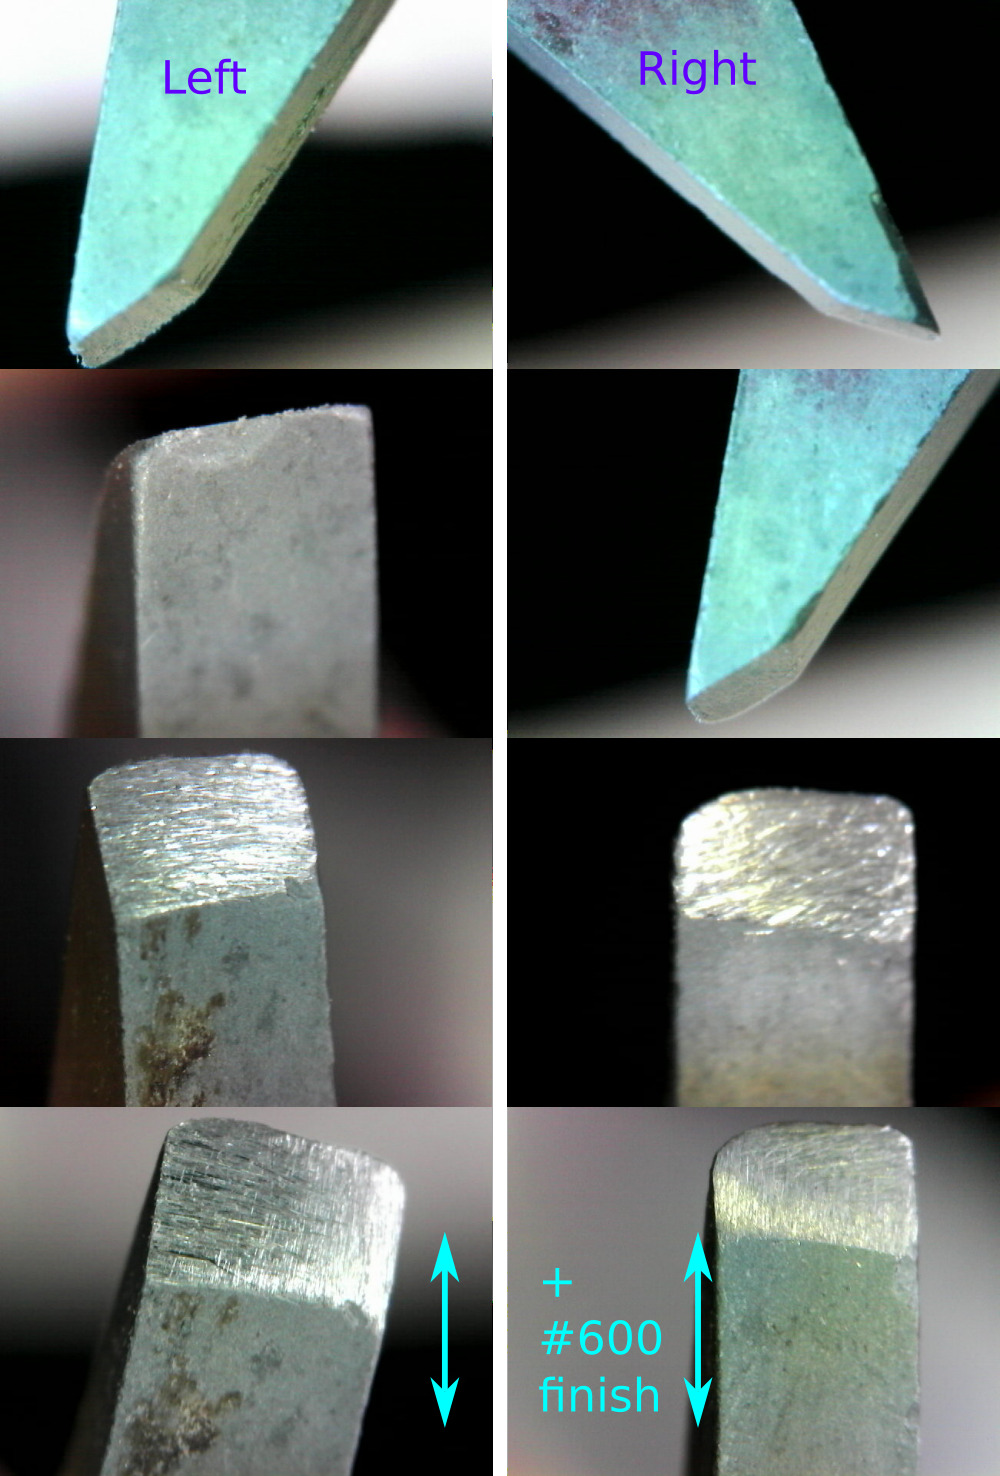
In the bottom two images, I quickly touched up the surfaces with a #600 fine grit (red) DMT sharpener perpendicular to the grain of the main grind. It doesn't look much better in these images, but the surface is noticeably smoother. I'm hoping that a better finish will reduce stress concentrations that lead to chipping.
Note I didn't bother with a back bevel since the back faces were not chipped and in good shape. I think a back bevel would have helped if I wanted to get rid of that rounded corner of the right one.
I just took them out and, yes, they now stick to the road like a burr on a poodle.
That's pretty much what I know about ski tip sharpening. There is a lot I don't know. I have some hypotheses that would be interesting to test. For example, I wonder if the main contact edge angle can be varied for different purposes. I'd imagine a sharper angle (than 45deg) sticks to the road better. While that would likely get dull quicker it might be useful for elite racing or other situations where maximum control and confidence are important. A blunter angle might last longer and be something to consider for very long training days.
Another conjecture I have is that surface finish might be important. If you look at the photos of the dulling tips you can see that a big issue is that pretty noticeable chunks sometimes chip off, sort of like flint knapping and not like abrasive grinding. I suspect that the grit of the stone used to sharpen the tips will impart surface texture features that are more or less conducive to this kind of breakage. What makes this kind of failure especially problematic for rollerski tips (vs plane blades) is that the expected shattering forces will tend to chip away — knap — at the back face just as much as the front. This will greatly add to the material that must be removed to recut the proper tip profile.
I'm also curious what different road surfaces do to tips. I'm pretty sure concrete is harder on tips than asphalt. I also know that cold pavement has more pole slipping than warm; how much does that affect tip wear? I do too much rollerskiing on wet pavement too and that has some subtle effects on pole tip bite.
Normally I use Solomon R60 Click grips and I change pole sides randomly. However, note that there is a left and a right in the images above since I'm using the USSPC's stock silver pole with high quality — but still intrinsically annoying — permanent straps. I suspect that keeping the same pole in the same hand keeps the wear edge straighter, but also wears it quicker and/or on an angle. I feel like switching up pole sides produces a more rounded tip wear. I'm not sure that's better or worse, but I note it because it could be worth thinking about.
It is probably also worth thinking about the ultimate angle the tips make with the ground and how you might use the secondary and back bevels to optimize that. Same for getting stress to transmit more directly into the center of the pole instead of being slightly cantilevered.
I have other sharpening hobbies and I wonder how diamond abrasives hold up generally. This is especially notable when you're dragging a thin thing like a rollerski tip over the same part of the sharpening plate. It's true you will not wear the diamonds themselves, but it is just diamond dust glued to a surface and that grit comes loose eventually and material removal suffers.
Maybe some day I'll look into these things but for now, that's pretty much all I know on the topic. Hopefully it is useful to someone else. Send me an email if you have any fun facts to add.