ImageMagick is a suite of utterly inscrutable programs designed to provide the ability to perform almost any kind of image manipulation that can be done programmatically, i.e. without live human visual interaction. This can be huge help for many tasks. Imagine making thousands of thumbnails or proofsheets from a huge catalog of images. Perhaps you need to standardize sizes for web consistency. Maybe you want to use uploaded images but have them be black and white. The problem with ImageMagick is the very challenging syntax which is not helped much by the light-duty man pages. Also it is split among a handful of different executables. Despite less than thorough man pages, there is excellent on-line documentation with visual examples. Here are some notes for operations I have done.
Resources
-
Official Usage Pages. Very
-
Official Options Reference. helpful for understanding how to compose ImageMagick commands.
-
Snigbo’s IM pages are mind-bogglingly good.
-
Fred’s pages also incredible but a bit harder to make use of.
ImageMagick Commands
-
convert - The main workhorse of Image Magick. Converts image A to image B, where B has new properties.
-
identify - Lots of information about images.
-
mogrify - Like convert but does not need an output file. Similar to the
-ioption ofsed. Test with backups! Can be used to batch process but since each input is implied as each output, you can’t use multifile operations likecomposite. Good for something likemogrify -path tndir -thumbnail 50x50 *png. -
composite - Overlays one image on another. Can also be accomplished with the
-compositeoption of the convert command. -
montage - Makes a larger image out of a grid of smaller ones.
-
display - A viewer.
-
animate - Like display but for animated GIFs and PNGs, etc.
-
compare - Compares two images. Output differences to a third.
-
stream - Extract only a portion of a very large image file.
-
import - Screen capturing.
-
conjure - Very obscure. Safely ignore.
Command Line Strategy
ImageMagick is often weird but never stupid. Its idiosyncratic command line processing style is subtle but reasonable once understood. The command (pretty much all commands from the Imagemagick family) is followed by arguments. These do not follow Unix/Gnu tools conventions. There are image specifiers. These either load or write an image or use (synthesize) a built-in one. They usually can infer the correct image type if you’re not being complicated. There are simple processing operators that work individually on each image that has been loaded thus far into the image stack. This happens immediately after the operator is read which why it is important to get your order right and have images to be processed loaded.
Here is an example command.
convert logo: wizard: -geometry 200x200 out.pngThis reads in the (pseudo) files logo: and wizard:. Then comes the
geometry operator which operate immediately on all images in the
stack — in this case, on each of them. The final argument is the
output but what will it do with two processed images? It turns out
that it creates two files called out-1.png and out-2.png.
There are some operators that take the entire stack of (perhaps) many
images and do something to the collection that produces just one
output file. These include -composite and -combine naturally
enough but many others too.
The image stack itself can be managed with some special operator
arguments like -delete, -clone, -reverse, -swap, etc.
Some operators are settings that are applied to subsequent operators.
A good example is -quality.
Built In Pseudo Images
Here are some images that can be used with ImageMagick that it generates on the fly for testing or programmatic applications. They add new images to memory and do not modify existing ones without further action. To see what some of the generative images look like try something like this.
display -size 100x100 radial-gradient:-
xc:'#RRGGBBaa' - Solid image filled with the specified color.
-
rose: - 70x46 color photograph of a rose.
-
granite: - A granite texture.
-
netscape: - A grid of various colors which in old times were "web safe".
-
null: - Single pixel of transparency.
-
info: - If you
convertto this you get output similar toidentify. Useful for debugging long processes. -
logo: - 640x480 color cartoon of the ImageMagick wizard.
-
wizard: - 480x650 hand drawing of the ImageMagick wizard.
-
canvas: - ?
-
gradient:
-
radial-gradient: -
-
plasma: random image of colors with a brightness gradient (it seems to me)
-
tile:
-
label:
-
caption:
-
text:
-
x:'root' - an alternative to using
import. Alsox:'root[640x480+0+0]
There are lots of patterns too which can be used with something
like: display -size 99x99 pattern:bricks
-
checkerboard
-
crosshatch$N - Where N is '' or 30 or 45
-
gray$N - Where N is 0-100 by 5%. 100 is white.
-
bricks
-
right$N, left$N - Where N is 30 or 45.
-
circles, hexagons, octagons
-
fishscales, smallfishscales
-
rightshingle, leftshingle
-
horizontal$N, vertical$N - Where N i '' or 2 or 3 or "saw". Or "bricks" or "leftshingle" or "rightshingle" for vertical.
-
hs_bdiagonal, hs_fdiagonal, hs_horizontal, hs_vertical
Generate Blank Image
A very common and useful thing to do is to generate an image of a certain size that is a solid color. This can be used for other purposes or as a backdrop in other ImageMagick commands.
convert xc:red -resize '640x480!' red.png
convert -size 640x480 canvas:tan tan.png
Note that when using xc: without the (quoted) exclamation mark,
you’d have strange overly helpful automagical resizing (480x480 in the
previous example).
Identify
ImageMagick is very handy for finding out properties of image files.
Often viewers scale images up or down and it’s hard to tell what you
really have. The identify program cuts through the mystery and gives
you the solid truth about an image.
$ identify xed.jpg
xed.jpg JPEG 420x236 420x236+0+0 8-bit DirectClass 24.1kb
Or if you need more detailed info.
$ identify -verbose xed.png | sed 11q
Image: xed.png
  Format: PNG (Portable Network Graphics)
  Class: DirectClass
  Geometry: 886x498+0+0
  Resolution: 28.34x28.34
  Print size: 31.2632x17.5723
  Units: PixelsPerCentimeter
  Type: TrueColor
  Endianess: Undefined
  Colorspace: sRGB
  Depth: 8-bit
If you need something very fancy look into the -format specifier.
Selective Processing
Fun fact: if you ask ImageMagick (convert) to resize an image to X
by Y and it already is X by Y, something happens (see
md5sum). The program probably should just
chill and ignore it, but it doesn’t. So what if you have a bunch of
images, some of which are too big, but many are the proper size? What
if you don’t want Imagemagick re-processing those correct ones? Here’s
a way.
time find -iname "*jpg" | while read F; do \
 echo -n "$F " ;X=$(identify $F | cut -d' ' -f4 | sed 's/x.*$//'); \
 echo $X ; \
 if ((X>1920)); then
  echo "Fixing..."; mogrify -verbose -resize 1920x1080 $F; \
 else \
  echo "Leaving untouched..."; \
 fi; \
done
Note that if selective processing gets too weird with the shell you
can always take a break by redirecting some output of filenames you
want to process to a file. Then you can use that file’s contents as
the targets of the operation with @ like this.
mogrify -resize 640x480 @/tmp/LongListOfFilesPrint Value Of Specific Pixel
Sometimes you need to know if some known thing like a watermark or logo is present on the image. Here is how you can extract the value of a single pixel at 50,1000.
convert in.png -crop 1x1+50+1000 -depth 8 txt:Note that txt: is a special output file that changes behavior to
dump output.
Fix Wrong Color
I have a bunch of images which should contain blue (0,0,255) masks. For some reason some of them are washed out to (32,32,248). This will find all such pixels and replace them with proper pure blue.
convert washedout.png -fuzz '100%' -fill blue -opaque 'srgba(35,32,248,1)' unwashed.pngAnother problem with those images is that sometimes while making the masks, Gimp used a fuzzy tool — so instead of getting crisp edge, I get a bunch of pixels with softening alpha values.
You can see a histogram of how many colors your image set has like this.
for F in *png; do identify -verbose $F \
| grep Colors: | cut -b 10- ; done | sort -n | uniq -c
To normalize it so that they all have only 2 colors, use this.
convert in.png -colors 2 out.pngAnother fun problem I ran into is that when converting a bunch of 2 color masks, anytime the entire image was only one color (and perhaps specifically white), the image converted automatically to grayscale. This caused problems and needed to be cured. Here are some possible helpful hints though this problem seems very hard.
convert I.png -define png:color-type=6 -crop 960x540+0+540 +repage +profile '*' O.pngTo get a sense of what the type codes are look at the "Properties:"
section of identify -verbose. Note that the star after the
+profile operator is (confusingly) to remove all profiles and is
not related to the files. Profiles show up in exif data and can be put
there by messy programs. This is hopefully a way to get rid of it to
standardize your images.
Format Conversion
One of the most important executables in the ImageMagick suite is
called convert and as you might expect one of its primary functions
is to convert images from one type to another.
$ convert xed.gif xed.png
$ identify xed.*
xed.gif GIF 257x198 257x198+0+0 8-bit PseudoClass 2c 1.33kb
xed.png[1] PNG 257x198 257x198+0+0 8-bit PseudoClass 2c 1.04kb
Unwanted Implicit Colorspace Conversions
Let’s say you have an image that was taken at night with a camera that in the day could produce color images, but this image happens to have no need for colored pixels. The camera did however encode it as having a colorspace of "sRGB". ImageMagick does not like such wasteful situations and if you convert such an image, it is likely that it will change the colorspace to "Grayscale". Great, so maybe you save a few bytes which could be nice if it’s a logo that you’re sending to web clients billions of times a day. The problem is when you’re trying to load a set of images in something like OpenCV which expects all images to be the same and now some of your images break because they have been reasonably but incompatibly converted to a different matrix "shape". Here is the question answered by fmw42 the creator of Fred’s IM Scripts.
That solution which did work was to use the "PNG24:" prefix on all image conversions.
convert $F -resize 512x512! PNG24:./imgs-512${F##../imgs}This ensures that the matrix shape will be consistent. Note that when you look at the image with identify, it will have the colorspace preserved as "sRGB" like you want — but the type will still unnervingly be "Grayscale".
$ identify -verbose /tmp/t.png | grep '\(Type\)\|\(Colorspace\)'
  Colorspace: sRGB
  Type: Grayscale
This does seem to work fine with OpenCV loading.
You can try something like -type PalleteAlpha but it doesn’t seem to
do anything. Maybe for image types other than PNGs (TIFFs?).
Vector Conversions (Postscript)
What if you have an annoying EPS (Encapsulated Postscript) "image"
that you’d like to convert to a real bitmap. If the sizes come out all
wrong, consider setting the -density flag. Make sure it comes first!
convert -density 600 logo.eps -resize 600x logo.pngResize
Perhaps the most common application for ImageMagick that I have is resizing images. These are general techniques:
convert wrongsize.jpg -geometry 400x400 correctsize.jpg
convert wrongsize.jpg -resize 400x400 correctsize.jpg
mogrify -geometry 400x400 inplace.jpg
mogrify -resize 400x400 2020-02-*.jpg # globbing works with mogrify
I wish I knew how exactly the -geometry specification worked but if
you use something like 400x400 then the maximum dimension, in X or
Y, will be 400 with the other scaled to preserve the aspect ratio.
The official manual says, "Geometry is a very special option. The operator behaves slightly differently in every IM command, and often in special and magical ways." Great.
Another way to resize images that could be useful if you knew what percent of the original size you wanted.
convert xed.png -resize 50% half_xed.pngThere is also -scale which seems to be a less thoughtful version of
resize. Even more lightweight in trying to keep visual fidelity is the
-sample operator. The -resample operator is for changing
resolution or density (there is also a -density setting).
If you need thumbnails, there is a built-in -thumbnail operator that
is designed to make that easy.
There is a -magnify operator that tries to round the corners of
magnified pixels and maybe other tricks needed for making images have
more pixels without adding any new real information.
Destructive Resizing
If you need to squish the resulting image in one dimension to fit your
target dimensions you can use a !. I didn’t have to quote this in
Bash on the CLI for some reason but it’s not uncommon for Bash to do
crazy (history) things with ! so be careful.
find ../data/imgs -iname '*png' | \
while read F; do
    echo $F
    convert $F -resize 512x512! ./imgs-512${F##../data/imgs}
done
If you must produce an image of a smaller size but do not want it
scaled, you can crop it with a ^ in the same place as the ! went.
In theory. How exactly to use it is complicated.
There is also a -crop operator. An example of using this is to
remove problematic (or wrong) graphical time stamps from images. I had
a 4k image (3840x2160) where the bottom 110 pixels were scrap because
of a graphic timestamp. In this case the right edge of this camera’s
lens was blurry and the final size I needed was 1920x1080. So this
allowed me to crop off the bottom and right to the 1.77 HD aspect
ratio and then resize it comfortably with the worst parts already
gone.
mogrify -crop 3644x2050+0+0 +repage -resize 1920x1080 a.jpgOfficial documentation for resize in general and crop specifically.
Mirror - Flip And Flop
Sometimes you get an image and you know that for whatever reason, it
has been scaled on the X axis by -1. To put that right use the -flop
option of convert, no option argument needed. The matching -flip
works on the vertical axis but that seems a lot less useful to me in
real life. Maybe try both if your camera is upside-down.
Crop
The official web help is helpful. Cropping is a bit weird and like many other aspects of ImageMagick, there is much about it I do not understand.
The case where cropping most naturally comes in handy is when trying
to isolate a section of an image. Perhaps you have a series of video
frames and you only want the part that is looking out a car window
above the hood or something. To do this you can start by interactively
determining the region of interest. Use xwininfo and then click the
display (maybe feh or eog or display) and it will tell you a lot
including the "window ID". Now you use xev -id 0x3a00005. Then when
you mouse around the image in the display program, you’ll get
coordinate display of the pointer. Once you’ve figured out just what
you need, you can use something like this.
$ import -window 0x3a00005 -crop 250x125+387+321 subimg.pngThis will extract a 250x125 part of the window and if the window is 1024x768, it will be centered.
Imagine that you have two images that need to be the same size. They
are the same width but one is taller than the other. The taller one
has a bunch of sky in the top portion and it can be made the same
height as the other by cropping off the top. First check the images
with identify to see exactly what needs to be done.
$ identify ok.jpg tall.png
ok.jpg JPEG 420x236 420x236+0+0 8-bit DirectClass 24.1kb
tall.png[1] PNG 420x320 420x320+0+0 8-bit PseudoClass 256c 103kb
The tall one is 84 pixels taller than the ok one. It needs the top 84 pixel rows cropped off. This is done with the following.
$ convert -crop 420x236+0+84 tall.png tall.jpg
$ identify ok.jpg tall.jpg
ok.jpg JPEG 420x236 420x236+0+0 8-bit DirectClass 24.1kb
tall.jpg[1] JPEG 420x236 420x236+0+0 8-bit PseudoClass 256c 26.7kb
Note that this converted to jpg at the same time. ImageMagick tends to need a source and target name even if they are both the same file.
Here is an example of where I wanted to cut off the bottom 7 pixels off of an image.
$ identify bomb+caption.jpg
bomb+caption.jpg JPEG 338x217 338x217+0+0 8-bit DirectClass 30.1kb
$ convert -crop 338x210+0-7 bomb+caption.jpg bomb.jpg
$ identify bomb+caption.jpg bomb.jpg
bomb.jpg JPEG 338x210 338x210+0+0 8-bit PseudoClass 256c 33.8kb
Replace Transparent Backgrounds With Color
This will change an image with transparent regions into one with a color (white here) background.
convert clear.png -background white -layers flatten fixed.pngIf you have a bunch of such images that you need to fix in place, this works.
mogrify -background white -layers flatten *pngSince the border feature actually creates a separate image of the border and then overlays it, you can use this to provide a background for transparent PNGs and GIFs and other formats that possibly have transparent backgrounds. I find this most useful when exporting to a bitmap from Inkscape. In Inkscape, everything looks fine, but when you go to a browser or viewer, it turns out that the lack of background is quite annoying. You could put a big white rectangle at the lowest level of your Inkscape vector model before exporting, but this fix from ImageMagick may be easier since all of your images can be done in one quick operation.
$ convert -border 0 -bordercolor white xed.png xed.pngImport
Imagemagick is good at doing screen captures. I prefer it to fancy GUI things because it can be properly scripted and controlled.
Find the window ID with xwininfo.
$ WID="0x3200097"
$ import -window ${WID} +frame mylilscreen.png
Also for the whole screen use something like this.
$ import -window root wholescreen.pngNote that this just captures the first monitor.
Often I want a frame of a video I’m watching. I have the video paused in the player and I just want its entire window. I use this alias to do the job.
alias importwin='import -window \
$(xwininfo | sed -n "s/^.*Window id: \([^ ][^ ]*\) .*$/\1/p") \
$(date "+/tmp/win-%Y%m%d-%H%M%S.jpg")'
Line breaks are obviously not really ideal there. And don’t forget to
use .png if you need some kind of image that is not photographic.
Another common thing I want is to grab some part of the screen — maybe it’s a section of video I’m watching or a Blender sub window,
but just using some kind of geometry will not work. The thing to do
here is to get a terminal and size it over the region of interest.
Then use xwininfo and then move the terminal out of the way. Then
you can use a command like this (repeatedly if that’s helpful).
import -window root -crop 1055x794+1397+270 sample.pngAnnotate
Remember how YouTube used to have those little text overlays you could add? Then people started using them only for obnoxious advertising. Well, I used them so that my videos didn’t need a stupid obnoxious sound track (I could explain in text the important things). I’ve been looking for a way to get that functionality back and I think that ImageMagick can do it.
Check the annotate features.
Here is an example of putting a caption on a video frame before assembling it.
convert frame-0342.png -fill white -undercolor '#00000080' -gravity South
-pointsize 40 -annotate +0+25 ' Note the space padding here. '
frame2-0342.png
Maybe you need to annotate an image or some video frames with a reference grid or marker. See the next section for some tips on that.
Drawing
ImageMagick can do much fancier things. For example, if you need some lines superimposed over an image. In this example, I wanted some lines superimposed over some dashcam lane lines (red on the port side, green on starboard). I also wanted to crop so just the road was visible.
for F in *jpg ; do
    convert -stroke red -strokewidth 5 \
    -draw "line 480,970 890,750" \
    -stroke green \
    -draw "line 1395,970 1040,735" \
    -crop 1920x300+0+675 ${F} lines-${F}
done
Borders
ImageMagick does a good job of quickly putting borders around images. Here’s an example that puts a red border around an image where the border on the left and right is 10 pixels and the border on the top an bottom is 5 pixes.
$ convert -bordercolor '#ce0000' -border 10x5 xed.png xed.pngComposite
If you’re trying to mix parts or elements of two (sometimes more)
images, you can use ImageMagick’s composite command. (There are also
often ways to do the same thing with convert -composite but worrying
about that just adds complexity usually.)
Let’s say you’re labeling dashcam images for segmentation training and you have a hand drawn png of the road or whatever feature you’re looking for — how can you show this mask lightly superimposed over the original image?
composite -dissolve 25 road_mask.png scene.jpg road_highlighted_on_scene.jpgChange that dissolve value to vary how transparent the mask is.
What if in the same situation, your dashcam footage always had the hood of the car? Maybe when you were annotating it by hand it was convenient to just bucket fill "road" all the way to the bottom of the frame but now you want to go back and remove all the parts that are static in every image. Here’s how that can be done.
composite -compose Clear null: road_mask72.png car_static_mask.png out.pngThe way this works is the composite command layers the three images sequentially as loaded.
Here’s a more complex example. The situation is there is a 2 color
mask image of blue and white, mask.png. This could have some
features marked up as detected by some neural net or something. Then
there is the original photo, scene.jpg. This will highlight the
original photo with red where the scene formerly was white and
simply show the original photo scene where it was blue.
convert mask.png -transparent blue -fill red -opaque white\
scene.jpg\
-compose dissolve -define compose:args=50 -composite hilightedscene.jpg
It does these steps.
-
Loads the mask image.
-
Converts all blue pixels to transparent.
-
Sets the fill color to red.
-
Converts all white pixels to an opaque fill color, now red.
-
Loads the original photographic scene — note
.jpg. -
Sets the compose method to dissolve (which is like blend).
-
Sets the compose value to 50%.
-
Perform the composite function on the two images using current settings.
-
Write to output image.
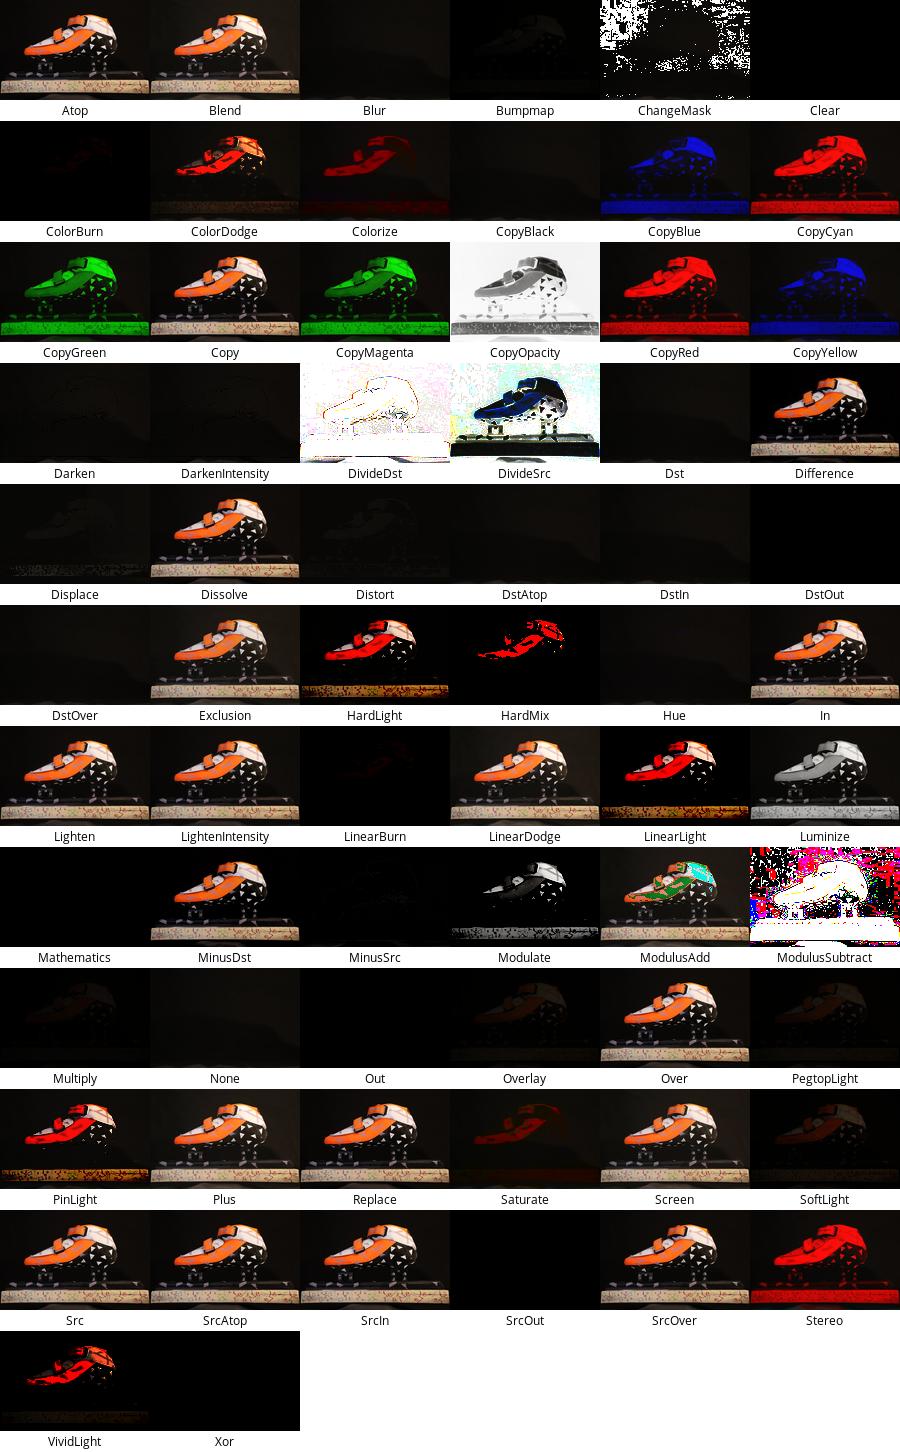
Composite Compose Modes
You can see all of the compose modes that can be used by composite functions with this command.
$ identify -list composeThe number of options is bewildering and how it relates to your project can be challenging to figure. This very elegant tip shows how to make a montage of all of the modes. It basically looks something like this.
$ convert -size 200x100 xc:black -fill white -draw "rectangle 50,25 100,75"  whiteL.png
$ convert -size 200x100 xc:black -fill white -draw "rectangle 100,25 150,75"  whiteR.png
$ for b in $(identify -list compose); do |\
convert -gravity center -pointsize 72 -label "$b" \
whiteL.png whiteR.png -compose $b -composite miff:- ; done |\
montage -geometry +0+0 miff: montage.png
For compositing two black background images with white dots, I found that the "CopyRed" worked well. It changes the colors in the way you’d expect "Stereo" (identical results) to (as in 3d glasses). The other "Copy___" color modes do similar things. To preserve the white dots try "Blend".
Here’s a nice example of doing this kind of comprehensive check for this project.
Montage
If you work with sets of images it can be nice to have a way to visualize the whole collection at a glance. A "montage" is an image composed of a grid of other images. Here are settings I use the most.
montage -background '#cecece' -geometry 64x48+1+1 src-*.jpg montage.jpgNote that the geometry will control the geometry of the inset images.
The +1+1 component of the geometry specification controls how much
padding there is around the images. Other options of interest.
-
-label %f- Add the file name as a label to each sub image. -
-stroke '#ff0000'- Color of label text. Also a-fillcolor might be needed with big text. -
-frame 3- Add 3 pixel shaded borders to each sub image. -
-mattecolor '#ff0000'- Color of the frame. -
-border 3- Similar to-framebut less decorative. -
-shadow- Adds a fancy shadow for each sub image. -
-tile ${COL}x${ROW}- Organize the grid of images yourself. -
-tile ${COL}x- As many rows as needed. -
-tile x${ROW}- As many columns as needed. -
null:- Use this as an image name in a place where you want blank.
Full official details on montage.
Here’s an example.
montage -tile 4x -geometry 168x94 tn*.jpg vidmon.jpg

Here’s how I made a video of two sets of images shown side by side.
for N in {0001..2509}; do
    echo $N; montage -geometry 350x350 /tmp/r112/radar-${N}.png r512/radar-${N}.png radars-${N}.png;
done
The original image sizes here were 350x350 and the montage is 700x350.
Maybe you have a zillion big images and you want a montage to roughly show what this archive contains. I have had trouble with running out of memory. There apparently are ways to limit memory usage. Some of that is described here. As the comments suggest, the CLI options didn’t work for me. I didn’t try the config file. I was able to process 1000 photos by converting them to their thumbnail size into another directory as an intermediate step.
Here’s a way to summarize the process of making the montage in two steps.
mkdir tn; for N in *jpg ; do convert -verbose $N -geometry 400x300 tn/$N ;
done;\ montage -tile 3x -geometry 400x300+1+1 tn/*jpg montage.jpg
Even doing it this way can cause memory problems if your images are large enough. Remember, that ImageMagick is keeping the full image (not compressed) in memory when it works on it.